How to Setup Google Authenticator - Android
Android
Requirements
To use Google Authenticator on your Android device, it must be running Android version 2.1 or later.
Downloading the app
- Visit Google Play.
- Search for Google Authenticator.
- Download and install the application.
Setting up the app
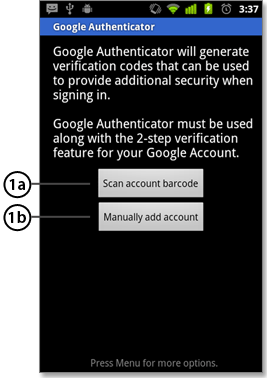
- On your phone, open the Google Authenticator application.
- If this is the first time you have used Authenticator, click the Add an account button. If you are adding a new account, choose “Add an account” from the app’s menu.
- To link your phone to your account:
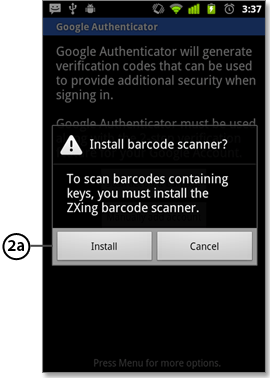
- Using QR code: Select Scan account barcode (label 1a). If the Authenticator app cannot locate a barcode scanner app on your phone, you might be prompted to download and install one. If you want to install a barcode scanner app so you can complete the setup process, press Install (label 2a) then go through the installation process. Once the app is installed, reopen Google Authenticator, point your camera at the QR code on your computer screen.
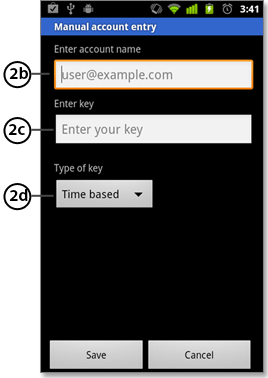
- Using secret key: Select Manually add account (label 1b), then enter your email address in the box next to Enter account name (label 2b). Next, enter the secret key on your computer screen into the box under Enter key (label 2c). Make sure you've chosen to make the key Time based (label 2d) and click "Save."
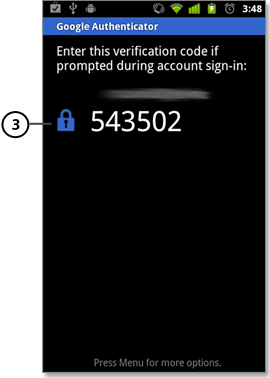
- To test that the application is working, enter the verification code on your phone (label 3) into the box on your computer next to MFA pin, then click "Continue."
The clock icon on your phone will let you know how much time is left before the verification code expires and a new one is generated.
- If your code is correct, you will continue to the next screen. If your code is incorrect, try generating a new verification code on your phone, then entering it on your computer. If you’re still having trouble, you might want to verify that the time on your phone is correct or see the Appendix for Troubleshooting tips.